
I’ve had this problem since the first use of Mountain Lion. With Snow Leopard everything worked without problem, except for stuck volume controls (this is why I moved to Mountain Lion).
I searched, over many seas, a solution to this common problem: someone call the apple customer care, some others install modified kexts. I did nothing of the above. Here I show a really simple workaround to start again using your HDMI audio. Keep reading.
My Mac Mini 4,1 is connected via HDMI to my ASUS 22″ 1080p monitor.
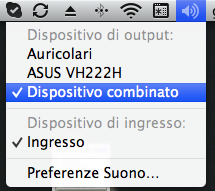
When you press option+click on the volume control you’ll see a list of available devices to output your audio. If you have a setup similar to mine, you then have headphones and HDMI monitor option listed. Like this image shows.
 If you select your HDMI monitor, selection goes to the headphones automatically, and also does your audio. Pretty disappointing! It will be more fair not showing me that option!
But let’s move on.
Give a CTRL-Space to open Spotlight and search for midi audio, like this:

In this panel we can see what’s going on in our Mac, you know how they say:

LET’S SEE ALL THE PERIPHERALS!!
So here is the panel, you’ll se headphones option, and also HDMI. If you click on HDMI and then select Configure button on bottom-right, you’ll be amazed to know that audio works by testing left and right channel!!! Why do they don’t work normally by default then? The answer is: I don’t know!

So what’s next? Hit the plus button bottom-left and then add a combined device(translations may vary)
 And select with device use with this new device. In my case I want audio to go only via the HDMI port, so I checked that. Then right-clicked this new device and told it to be the default one for audio (you can change this also with option+click on volume control). Be sure to have 44100Hz selected (option that worked for my setup).

This is another shot, a useless one, but I can’t just throw it in the bin…it’s always a creation of mine, you know what I mean?
Let’s sums things up: this new device lets you use you HDMI monitor to play audio like it did before. You can personalize your menu, renaming device, hide others, but this is not the point of this post.
Here’s the result:
 And it works like a charm! Without calling Apple Geniuses, installing modified kext (dangerous) and other tricks!
I hope this was somewhat useful to you.
Let me know how it goes, or better solutions in the comments below!
Thanks for your time.

