An Interactive Environment for the Didactical Manipulation of Programs

A MASHUP OF BLOCKLY AND ONLINE PYTHON TUTOR
MADE WITH BLOCKLY https://code.google.com/p/blockly/
AND OPT http://pythontutor.com/

Here is my work of the last 4 months.

Enjoy!
Thesis

Download PDF Thesis here

https://dl.dropboxusercontent.com/u/8738393/EPLEthesis.pdf

Presentation

Video embedded in presentation


Software

https://bitbucket.org/pnioi/eple/downloads/eple_v9.zip

(To run it locally on your machine, you have to install Google App Engine for Python [which you can find it here at time of writing https://developers.google.com/appengine/downloads#Google_App_Engine_SDK_for_Python ] and then launch the google app engine program and ‘add existing…’ which will be the content of the zip from above, and press play to run it locally)

Web app

http://epleweb.appspot.com/

This work has been referenced in

https://www.kickstarter.com/projects/thoughtstem/codespells-express-yourself-with-magic/comments?cursor=8021516

and in

BloP: easy creation of Online Integrated Environments to learn custom and standard Programming Languages (Stefano Federici, Elisabetta Gola,università di cagliari, Italy)

at siremsiel2014  (sirem – sie – l 2014 )

Arduino, Midi driven Leds/Stuff

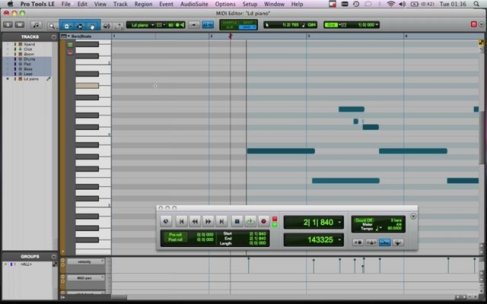
Here are a few step to set-up the basis for an interactive installation with lights(or solenoids, or whatever you can imagine) driven via midi commands, an easy way to planning what has to light up and what has to shut down via a midi track, like this sample image show(a note in time sets light up or shut them off).
Image

I’m using Serial <> MIDI converter from spikenzielabs.
All the stuff, inner working, files, installation and usage steps are explained here http://www.spikenzielabs.com/SpikenzieLabs/Serial_MIDI.html

Basically you need to create two midi ports via you’re preferred audio configuration system in your preferred operative system, and the map them to be used in your serial midi tool.
The serial midi tool acts like a proxy, if you want to put it in this way.
Here is a drawing to explain a little bit the underlying architecture.(made with balsamiq mockups webdemo -> code http://pastebin.com/nY2tAUAK )


You need Processing to run the converter program(script), but you can create the application once for all with processing itself.
The example in the site linked above does only a write on the serial port, and it makes arduino send midi to the computer.
I’ve done it the other way, my computer sends midi to the arduino and the arduino acts accordingly to what I’ve told him to do.

Steps to follow:

  1. connect arduino and if you haven’t already done it, upload sketch(once you’ve done it, you’re ok with arduino)
  2. start serial <> midi (select midi ports you’ve previously created)
  3. start midi software(and if you haven’t configured it yet, do it)

All this happens via software, no hardware needer other than an arduino board with some resistors and Leds.
There are many guides out there that open apart a midi connector and plug it in the arduino to make an arduino talk directly to midi devices, but this is not the case.

Here is the arduino code (sketch) that I’ve put up (with some help of internet)
http://pastebin.com/e8ekuyTE 

Here is a screenshot of my desktop during the process

Here is a (bad quality)video of me sending midi notes to the board.

Quickly process a JSON string

So this method is so naive that I’m not so proud of it.
But “hey, we have plenty of resources now, and we I’ve paid for it!” they say…
Actually this a homemade/handmade/whatever kind of parser for a JSON string like this:

{“user”:”paraimpu”,”text”:”Hi Twitter buddies”, “created_at”:”Wed, 05 Oct 2011 13:45:03 +0000″}

What I do: I analyze every character of the json string, and look for a first  quotation mark like this ” .
Then I save all of the text until I find another quotation mark.
All the rest is ignored.
I build a string with all the characters inside the two quotation marks, and then add that string to a List.
Then I scan that list in another function, and when I find a field of interest, like ‘text’, I know that the related content of that field is one cell ahead, ready to be used (because the json string is structured that way).
Nothing more, nothing less, no libraries, so naive.
This is what I get if I print the elements of that list


user paraimpu text Hi Twitter buddies created_at Wed, 05 Oct 2011 13:45:03 +0000


Here is the code for processing (Java derived language) but you can quickly understand how to replicate it in other languages.

http://pastebin.com/MTY0JPXW 

I’m still messing around with Paraimpu’s functionalities.

Resizing (multiple) images with IrfanView and VBScript on Windows

I’ve just created a VBScript ( Visual Basic Script ) on windows to help me automatize the process of resizing images, without having to do each photo manually.

If you want to test this little tools, be sure to download IrfanView here 

and my code here on my pastebin account http://pastebin.com/J7UaMuY7 .
Be sure to save the code listed as plain text ( no .rtf/.txt/.whatever stuff ) and with .vbs extension.
Feel free to modify the code and/or to leave a comment to let me know if it helped you.

Successfully tested on Windows 7 and Windows XP.

Android, BroadcastReceiver, headset controls

Power to opensource!

Because of it I could personalize an app by adding a few lines of code, without reinventing the wheel.

Goal: improve a mediaplayer app to handle headset controls events, even if the screen is off or I’m using another app (there it goes the broadcast receiver functionality).

First, main activity must implement OnKeyListener

...
import .........
...
public class MPlayer extends Activity implements OnKeyListener {...

Second, implement the method OnKeyDown

public ImageButton playButton;
public ImageButton stopButton;
public ImageButton skipButton;
 ....
  oncreate method that instantiates those buttons, by findviewbyid for example
  ....
@Override
public boolean onKey(View arg0, int arg1, KeyEvent arg2) {
// TODO Auto-generated method stub
	return false;
}

/* media controls */
public boolean onKeyDown(int keyCode, KeyEvent event) {
super.onKeyDown(keyCode, event);
switch (keyCode) {
	case KeyEvent.KEYCODE_MEDIA_NEXT:
		skipButton.performClick();
		return true;
	case KeyEvent.KEYCODE_MEDIA_PREVIOUS:
		stopButton.performClick();
		return true;
	case KeyEvent.KEYCODE_HEADSETHOOK:
		playButton.performClick();
		return true;
		}
		return false;
}

Third, create the receiver

/* creating an intent filter */
private final BroadcastReceiver headsetReceiver = new BroadcastReceiver() {
public void onReceive(Context context, Intent intent) {
	String intentAction = intent.getAction();
	if (!Intent.ACTION_MEDIA_BUTTON.equals(intentAction))
		return;
	KeyEvent event = (KeyEvent) intent
			.getParcelableExtra(Intent.EXTRA_KEY_EVENT);
	int keycode = event.getKeyCode();
	int action = event.getAction();
	Log.i("keycode", String.valueOf(keycode));
	Log.i("action", String.valueOf(action));
                 //onKeyDown(keyCode, event)
	if (keycode == KeyEvent.KEYCODE_MEDIA_PLAY_PAUSE
			|| keycode == KeyEvent.KEYCODE_HEADSETHOOK)
			if (action == KeyEvent.ACTION_DOWN)
				playButton.performClick();
	if (keycode == KeyEvent.KEYCODE_MEDIA_NEXT)
			if (action == KeyEvent.ACTION_DOWN)
				skipButton.performClick();
	if (keycode == KeyEvent.KEYCODE_MEDIA_PREVIOUS)
			if (action == KeyEvent.ACTION_DOWN)
				stopButton.performClick();

		}

};

/* unregistering intent receiver */

public void onDestroy() {
	super.onDestroy();
	unregisterReceiver(headsetReceiver);
}

Last, registering the intent receiver in onCreate method

/** Called when the activity is first created. */
@Override
public void onCreate(Bundle savedInstanceState) {
	super.onCreate(savedInstanceState);
	setContentView(R.layout.main);
		/* creating and registering intent receiver */
	IntentFilter mediaFilter = new IntentFilter(Intent.ACTION_MEDIA_BUTTON);
	mediaFilter.setPriority(1000);
	registerReceiver(headsetReceiver, mediaFilter);
         ....
         ....

Last but not least, even if you declare and register the intent receiver via code, you can also add a couple of lines of code in your app manifest

<activity android:name=".MPlayer" android:label="@string/app_name">
	<intent-filter>
		<action android:name="android.intent.action.MAIN" />
		<category android:name="android.intent.category.LAUNCHER" />
	</intent-filter>
	<intent-filter android:priority="1000000000">
		<action android:name="android.intent.action.MEDIA_BUTTON" />
	</intent-filter>
</activity>


Sources: various( I mean VARIOUS, like ALOT) android articles, android developers docs and google results and my working app. Headset finally plugged in and controls being used!

Java Screen Viewer

This evening my friend Mauro asked me if I knew some software that would allow him to have a preview on its main display of what his secondary display was showing, as this secondary display is far from the main display.
I made my classic Google researches without getting many results.
Idea behind the software itself is simple, but all I found was licensed software, not free and not opensource.
I decided to try to implement it by myself, first with no success using C++ and QT 4.6(I’m not yet that good with QT), then switching to an implementation in Java, using multi-purpose class called ‘Robot’.

Here you can find a screenshot of my dual-monitor setup and  a screenshot of what the java app is capturing.

You can choose fps and how big the area that you want to preview has to be.

It loads simple parameters from a configuration file that must be on the same directory of the executable jar.

It also save configurations to that file

Windows has a contiguous area of desktop, also when you have a multi monitor setup: depending on how you’ve placed the monitor in the Screen configuration setting, you can easily find the correct values of configuration parameters that allow you, for example, to fully preview the secondary display.

Given a start position (x,y) and width and heigth of the preview rectangle, it captures only that pixels in that area.

In my example, my secondary monitor start showing pixels from coordinate (1280,0) within a rectangle of 800 by 600 pixels.

Screenshots

Full desktop screenshot

Java App screenshot

Source code and executable

[Be sure to have a java runtime environment installed, then lanch with ‘java – jar <xxxx>’ from your prompt/terminal o double-click gui mode]
[Netbeans project, 6.5.1]